Mon Aug 4 13:48:22 MST 2008
To the Future
The last big change at the observatory was installation of
computer-room raised flooring in the observing room.
I was given about 400 square feet (37 squre meters) of flooring;
it wasn't enough to do my entire observing floor, but by installing
some of it, I was able to gain easy access under the floor to run
cabling to the telescope piers,
and get underneath the floor myself, should it become necessary.
Otherwise, not much changes at the observatory any more; things are pretty well set up the way they're going to remain. There are, however, a few things I would still like to accomplish.
I'd like a desk, or something that passes for one, in the basement. Ideally, it would have some large work surface where I could lay out charts or photographs for study. I could also use another cabinet or two for equipment storage.
I have an open rack holding 96 small-parts bins, but I'd really rather have an enclosed cabinet; that would also more than double the number of bins.
The stairway leading from the observing floor to the basement is well made, but very poorly designed, and is, in fact, rather treacherous. It really needs to be replaced. But I keep putting that off, as what I really want to do is revamp the whole setup to include some sort of platform lift so I can more easily move equipment from the basement to the observing level. The hoist in the roof was a useful idea, but it runs too fast (and it leaks oil on the hottest summer days, which can't be good for it). And while using the rolloff roof itself as a travelling crane works rather well, it is of course not possible to do that in poor or windy weather. A lift in the stairwell would make these problems go away.
The gable ends of the roof really need ventilation fans, to help mitigate the heat buildup inside the building during the summer.
The interior walls of the observatory really need to be black (or perhaps a dark blue), not white. The roof can stay white; it helps by reflecting light when the ceiling lights are on, and the roof is rolled off when observing so it doesn't affect anything at night.
I need a small wooden cabinet to hold the networking gear upstairs; the green lights from the network switch are downright annoying when you're dark-adapted upstairs at night. It's also probably Not Good when frost settles onto the switch on cold winter nights (which is also why the cabinet should be wood and not metal).
It would be nice to have a power-recording monitor, so I would know when and how often the power goes out. Without knowing this, I might be surprised by unintended biology experiments in the refrigerator.
Some of these things will probably get done, and some will not. Now that the observatory is up and running (and producing images) the incentive to change things is greatly reduced!
Wed Jul 30 10:52:18 MST 2008
Fast Forward
A lot has happened at the observatory since the construction phase was
completed in July of 2002. It's all been a matter of incremental improvement,
though, rather than any giant leaps for mankind.
Right about the exact same time as the construction was finishing up, the observatory's major telescope, an Astro-Optik Hypergraph, was delivered. This telescope, which is a Ritchey-Chretien design, rides on an Astro-Physics 1200GTO mount.
A couple of years later, a Paramount ME telescope mount was purchased from Software Bisque. The intent is to interchange several different optical systems on this mount.
Both of these mounts now sit on heavy welded piers constructed by a local welder. The piers are made of 10" diameter steel pipe with 1/2" (1.25 cm) walls, which are filled with ground-up slag from an old copper mine; they each weigh an estimated 800 lb (360 kg).
Somewhere along the line, during the construction, the 40-acre (16 hectare) property was enclosed by a barb-wire fence and a pair of 16-foot (5 meter) gates. For those who remember (you know who you are): building a mile of fence in the desert is a lot easier than building any length of fence in the Wisconsin woods!
The roof is now motorized; it rolls with the aid of a 10-hp reversible electric motor. That drives a gearing system that pulls a roller chain that is attached to the roof; the roof carries limit switches to tell the motor when to stop in each direction. All of this mechanism is located inside the building, so there is nothing external exposed to the elements.
The installation was quite a process -- we spent 14 straight hours on a July afternoon in 2003 doing the job with an electrician, a welder, and two helpers. We weren't ready to test until after dark, and, of course, the roof stalled halfway open. This being the middle of the monsoon season, it then, of course, started to rain. So we spent a half-hour, with rain coming into the open building, adjusting the roof mechanism and finally getting the roof to close. The rain promptly stopped, so we gave the roof a final full-on open/close test and declared victory.
The unique thing about the rolling roof is that there are electrical lines in the roof for lighting and for powering the hoist that moves heavy gear between the observing floor and the basement. The electrification is done with the aid of an Igus E-Chain, essentially a large plastic roller chain that is hollow inside; two electrical cables run inside the chain, which pays out as the roof rolls off the building and retracts as the roof rolls closed.
A Tough-Shed was purchased to serve as a wellhouse; it also houses the transfer switch and breaker panel for a Generac Guardian generator. As the years go by, power outages seem to be less frequent than they used to be, but the generator is there so the roof can be closed even if the approaching thunderstorm knocks out the utility company power.
A heat pump was installed for climate control. Left to its own devices, the winter temperature in the basement is 54 degrees F (12 C). The summer temperature is normally 81 degrees F (27 C), though it can hit 82 during hot spells. So the heat pump doesn't have a hugely difficult task, though it works pretty hard during the winter for the first couple of days after I arrive -- it has to heat everything in the basement, including the concrete block walls, to around 70 degrees F (21 C). Once there, it maintains that temperature pretty easily.
The thermostat for this setup communicates with the heat pump controls over a 3-wire digital serial bus. There's an RS-232 computer serial-port interface wired into the setup, so I could control the heat pump over the Internet with a bit of software work, if necessary.
After having a difficult time carrying the dishwasher down the stairs, we quickly decided that this plan was Just Not Working Well, especially since that was the lightest and smallest unit. So I called in the boom crane that served us so well during the building construction. The rolloff roof came in handy -- we rolled it back, picked up the appliances, and lowered them down the stairwell to the basement.
This same procedure worked out well for the 2,500 lb (1150 kg) of metal library shelving that holds the observatory's book and magazine collection. I had it all delivered by motor freight directly to the business that had the boom crane; they brought it out and delivered it directly to the basement floor.
The observatory basement has a rack which holds the computers and network gear; one of those computers serves the BRO web site and the blog you're reading now. There is a gigabit fiber-optic cable running upstairs to the observing level; more network gear up there connects the telescope mounts and CCD cameras to the computer in the basement that drives them. This means that the scopes can be operated from the climate-controlled basement with the lights on and the refrigerator within handy reach! (This has vastly increased the hours-of-use of the scopes ...)
After designing some adapters and making the acquaintance of a couple of good machinists, cameras can now be attached to the telescopes. Some images have been taken, and the results look good.
Slowly but surely, activity at BRO is shifting from the manufacturing side to the operational side.
Tue Jul 29 20:02:42 MST 2008
Finishing the Basement
The basement is fitted out now and
ready to move in! Now it's time
for bookshelves (I found a web site that sells used library shelving),
furniture (including a couple of nice recliner chairs), and computers
(like the one that's feeding you this blog).
I recruited a couple of friends and we went down to the observatory to frame the interior walls of the basement, preparatory to fitting it out as a living area. Basically, there are two rooms -- a darkroom that ultimately became a bedroom, and a bath/laundry. The kitchen is on the outside wall of the bath, so most of the plumbing is inside a single wall.
After that, the builder came back one last time, to help install the shower. It required a concrete-block base with cement board on top with pads of grout for the shower-stall to sit on (the shower had to be raised because there was no plumbing inside the floor slab), and his proven expertise with block and concrete made him the right person for the job.
After almost two years of near-constant concern about the observatory, with a list of things to do seemingly every day, I confess that I let my concentration lapse when it came to the basement plumbing and electrical. I failed to do my usual job of thinking about every detail and anticipating every need. I can only plead burnout ...
As a result, I would up with a cheap, low-quality valve for the toilet -- the kind with the oval handle that requires an adjustable pliers to turn as they age, instead of a nice 1/4-turn valve. And I got 1-million-turn gate valves on the water inlet piping instead of high-quality 1/4-turn ball valves. The same kind of valves got put on the clothes washer inlets instead of the really spiffy single-lever dual valve I would have liked. Basically, instead of good stuff, I got whatever was on his truck.
And the plumber turned out to be more of a copper-tubing solderer than an actual plumber. He failed to put in a drain line for the water heater TP valve (this is the valve that pops if your water heater goes overpressure; it's a code requirement that the plumber seemed clueless about), and didn't install a drain line for the pan beneath the water heater. We had to correct these things later on; the result is pretty ugly, but it's serviceable.
Fortunately, at the last minute, I thought about putting an anti-hammer device on the water inlet line -- the plumber didn't even know what that was, so had it been up to him, there wouldn't be one. If you've ever been in a house where the cold-water line bangs when you shut off a tap, you'll know why an anti-hammer device is a good idea.
After that fiasco, somebody else did the finish plumbing. He helped me correct the problems caused by the rough-in plumber, and did a great job in finishing the plumbing professionally.
The electricians that worked on the building were a lot more professional; they did both what I asked and what needed to be done for code. The failure there was entirely my own; I needed to do a much more meticulous job figuring out where I wanted lighting, outlets, and switches. There's been a lot of retrofitting as I get things set up the way I should have done it in the first place.
One place this really affected things was in the circuit breaker panels. Since I started out with such a minimalistic idea of what I wanted, the installed panel is a lot smaller than it should have been. Ultimately, we had to install a second panel at the far end of the basement to accommodate the circuitry I wanted. So, of course, I insisted on a larger panel upstairs at the observing floor -- and naturally, it's less than half full!
Anyway, despite my ineptitude, and entirely due to the efforts of a highly-skilled local home repairman, the basement walls were finished, textured, and painted. At last, the observatory is ready for extended stays. Now if only I had some mounts and some telescopes ...
Tue Jul 29 10:31:36 MST 2008
Observing Floor
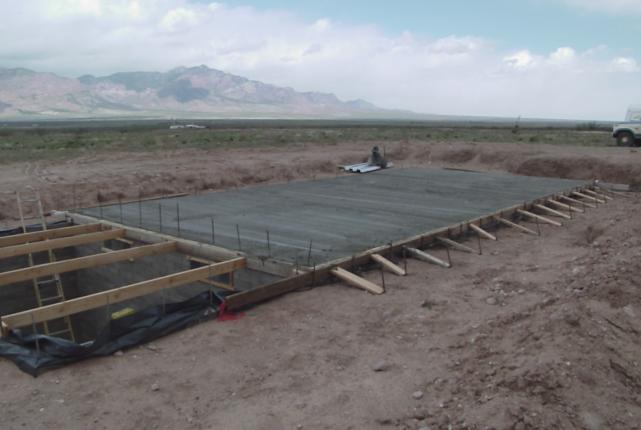
The week ending August 24th, 2001, was the last week of heavy construction
at the observatory. We installed floor joists, laid plywood, and tiled the
floor at the observing level
of the building.
In the intervening 3 weeks since the building exterior was finished, the stairway was installed, along with a railing to prevent falling down to the basement floor 12' (3.7 meters) below. The rolloff roof proved to be particularly handy for installing the heavy metal stairway and its landing; we just rolled back the roof, picked up the items in turn with a boom crane, and lifted them over the walls and dropped them into place.
The original plan had been to install computer-room raised flooring on the observing level, but 600 square feet (55.7 square meters) of this flooring, even on the used market, was just too costly. It would have been a real pain to install around the telescope footings, anyway.
The height difference between the observing floor and the slab is 27" (68 cm); I thought this would be plenty of space for floor joists while still leaving room for me to crawl around the floor underneath the joists when necessary. But the 18' 8" (5.7 meters) span, plus the requirement to support 1000 lb (450 kg) of rolling weight when swapping telescope piers, meant that the engineered TJI joists needed to be 18" (46 cm) high. Subtracting another inch for the plywood left just an 8" (20 cm) gap between the slab and the TJIs, something I could not fit into. But there was nothing to be done about that now.
So we installed the TJIs, framing around the telescope footings with some additional support, and then laid 1-1/8" (3 cm) tongue-and-groove plywood over the top. We then tiled the floor in a gray mottled tile.
As it turned out later, the builder would be back for one more day. But otherwise, this was it -- his job was done. The only remaining tasks were finishing out the basement, with plumbing and electrical work, and some electrical work upstairs at the observing level.
Sun Jul 27 04:05:02 MST 2008
The Outside is Done!
Monday, July 23rd, 2001, was a bright sunny day at the building site. The
observatory building was finally beginning to look like, well, an actual
building. The roof trusses were up, the entry door was installed,
a concrete knee wall had been poured around the subfloor slab to match the
height of the stairwell, and we were ready for siding.
We installed the entry door by welding some steel columns to the building skeleton and then welding the steel door frame to the columns. The bottom of the door was 27" (68 cm) above the subfloor slab; the door looked really funny hanging high up in the middle of the sidewall.
After giving it some thought, it was decided not to lay blocks for the knee wall around the edges of the subfloor. The spacing between the steel columns didn't come out to even block lengths, so lots of cutting would have been required, and it would have taken a couple of days to do. Further, it would have taken some effort to get the block wall to work out to the exact height required.
Instead, we built some forms in about 2 hours and called in a concrete truck. This solved all of the problems in one stroke. After the weekend, we stripped the forms and we were ready to finish the outside at last.
A pickup arrived from Mesa, Arizona, about 275 miles away, with 2,400 lb (1,100 kg) of residential R panel siding, cut to length for the walls and the roof of the building, plus a wide range of caps and flashings. Fortunately, my builder knew exactly what to do with all of these pieces, and the job proceeded apace.
In a couple of days, the sides were on. Then, after a really brutal day in the sun, the roof was finished. For once, we could have used some clouds, and even an occasional rain would have been a welcome break, but it was not to be. This all-day job was really tough up there. The gable ends were sided, and then, finally, it was done.
There was, to my surprise, no fanfare, no ticker-tape parade, no visit from the President -- nothing. Suddenly, we had a building.
It seemed like forever, but it was just over two years since we'd bought the property, and just over a year and a half since we'd started the job by drilling a well. It took a year to build the buried basement, and I really thought it would be another year before the building was up. But instead, the above-ground construction took just 3-1/2 months.
To be sure, there's a lot left to do. There's no floor in the building yet. The basement is just an empty cave, and finishing it out is going to require a great deal of work. But there's a real building now!
One final note: after this monsoon season, with the building finally closed in, the rain stopped. I mean stopped; it almost didn't rain at all for over a year. After fighting the rain every inch of the way while constructing the basement and erecting the building, it just quit. I guess Mother Nature figured that if she couldn't make my life difficult, there was no sense in carrying on.
OK, the building needs a floor now.
Fri Jul 25 14:48:41 MST 2008
A Rolling Roof
My builder, besides being accomplished at pouring concrete and
laying block walls, is also an expert at erecting steel-siding utility
buildings. This made him a good choice for this job, because those
three areas are 90% of what it took to get this building put up.
At this stage, I wound up the last few tasks for the building shell. I found a supplier who was willing to deliver 2,400 lb (1,100 kg) of steel residential R panel siding some 275 miles to the building site, and ordered a prehung steel entry door (which I had to transport myself). The steel siding folks helped out by being very knowledgeable about all of the extra bits and pieces I'd need, like eave soffit pieces, end caps, ridge caps, corner and door flashings, etc; not to mention several boxes of screws for the metal frame and the wood trusses.
The builder carefully stacked the roof trusses into a neatly-aligned pile, and then used a circular saw to cut lined-up notches in the trusses for the 2x6s that would run the length of the building and provide support for the roof panels. Then the trusses went up with the aid of the boom crane.
Even this wasn't simple; because of the requirement for a couple of roof-mounted hoists, the trusses could not be evenly spaced, but rather had to be set out according to a spacing pattern worked out in advance. I never seemed to manage to be able to do anything in a conventional way.
But soon, the trusses were up and bolted to the brackets on the roof frame, the 2x6 cross-members were installed, and we were ready for the siding.
Fri Jul 25 14:17:56 MST 2008
The Skeleton of the Building
Well, it took some coordinating, but the
skeleton of the building
was finally erected with 3 days of work ending on July 12th.
The builder, the welder, the delivery truck, the boom crane truck,
and I all had to be at the building site on the same day.
Then things started happening rather quickly.
We bolted the base plates to the observing-floor slab, stairwell top, and rolloff footers, and then welded the steel columns to them. Then the boom crane got involved, hoisting the horizonal members to the top of the columns for welding. We added the corner bracing and welded in the 14-gauge box beams which will serve as purlins; these accept the screws that fasten the siding to the walls. Finally, X bracing was installed between a number of the columns to help keep the sidewalls from racking.
Left for the final day (after the photo was taken) was building of the base frame of the roof and installation of the angle iron that will guide the V-groove wheels on which the roof rolls.
To my immense relief, every bit of this "observatory frame on a truck" kit fit perfectly. It was all rather like building a full-sized building with parts from a Kenner Hydro-dynamic Building Set (I had one of those, back in the day; it's still in a closet here somewhere). Each part was the right size, dropped into place perfectly, and the whole thing welded together with ease.
The one problem we had was with the braces in the corners at the top of the wall. I had a local Tucson company cut 6-foot (2 meter) lengths of steel box beam at 45-degree angles at each end to fit into the corners; it would then be easy to simply weld them into place (or at least as easy as handling 115-pound (52 kg) pieces of steel at the top of a wall could be).
Unfortunately, they turned out to be rather less than certain what 45 degrees was, and missed by quite a ways. I would have thought this was fairly unambiguous, but incompetence abounds. At any rate, this meant that placing the brace flush against one wall beam made it wildly out of line with the adjacent wall beam; the best compromise position left a gap of over an inch on each end. We did the best we could by adding some scrap pieces of steel; the result isn't pretty, but it is functional.
We had to stop work several times during this phase; nobody wanted to be anywhere near the boom crane or the steel when there was lightning in the area (and boy, did we have some lighting!). We were suffering through yet another month of record rainfall (the third such month of this project). Some scrap residential siding was used to build a temporary roof over the stairwell, else we'd have had an underground swimming pool instead of a basement.
The end is in sight now, though!
Thu Jul 24 16:26:55 MST 2008
Building Subfloor
A lot more progress was made in May of 2001. After allowing the telescope
footings to cure for a couple of weeks, the forms were stripped off. Concrete
caps were poured atop the footings that will hold the steel columns that
support the rolloff roof rack. And the subfloor for the building that will
house the observing level was poured.
At the end of this bit of construction, you can finally begin to visualize what the building is going to look like.
One of the mistakes made during the construction was that the access ramp the excavator used to dig the basement hole was dug in the location where we were to pour the footings for the telescope piers. These footings should have been placed in undisturbed soil. In order to mitigate this problem, we had to do a lot of extra work.
First, when the ramp was filled in, extra time was taken to drive the heavy equipment over the area as each layer of dirt was dumped in, to compact the soil as much as was practical. Now, with the footings poured, we backfilled the hole surrounding the footings by hand, using a motorized tamper. A few shovelfuls of earth were thrown in, wetted down, and then tamped. All told, a day and a half was spent doing this; the footings should be pretty solidly in place.
Once that was done, we excavated and laid rebar for the subfloor for the observing building. Inch-thick slabs of styrofoam were placed around the two telescope footings so that the subfloor slab would not contact these footings. This will isolate the telescopes from building vibrations.
Simultaneously with the tamping operation, the electrician was out to install the electrical panel in the basement. He put in a temporary double-duplex outlet so we no longer had to run a couple of hundred feet of extension cords to get electrical power to the building site.
This was a time of extensive planning work on my part. The steel frame of the building would soon be erected on the subfloor slab, but the vertical members at the north end of the building would be on top of the stairwell walls 27" (69 cm) above the height of the slab. Additionally, the vertical supports of the rolloff rack would be placed on their own individual footings built on top of the basement roof. The top of these three sets of columns all had to be exactly level with one another; the beams on which the roof would roll would sit on top of the columns.
First, the steelwork was sized by a structural engineer. The building had to withstand 100 mph (160 km/hr) winds without significant flexure. This isn't as easy as it sounds -- remember that the roof rolls off the building, so there are no horizontal supports at the top of the walls to hold the walls together (or apart, as the case may be). It turned out that the skeleton of the building had to be built with 6" (15 cm) box beams, which have a wall thickness of 1/4" (6 mm).
I then sat down with a computer-aided drafting program and began to design the steelwork that would frame the building, rolloff rack, and roof. All of this steel had to be cut to exact lengths in Tucson; we weren't going to be able to do this cutting on site! And it all had to go together correctly the first time, or construction would have to stop. I spent a lot of time learning to use the program, then drawing, calculating, and redrawing until I was certain I had everything exactly right. This included bracing in the corners at the top of the walls and at the end of the roof rack to keep the building and the rack square.
At the same time, I got the V-groove wheels on which the roof would roll and designed brackets to attach them to the base of the roof; then those brackets had to be fabricated. Then I had to size the angle iron the wheels would roll on, and make sure that got onto the steel order, too.
To keep the roof from blowing away, C channel would be attached along the top of the building walls and the bottom of the roof, arranged in an interlocking fashion so the roof couldn't be lifted away. That all had to be designed in concert with the roof eave detail so that everything would fit without interference.
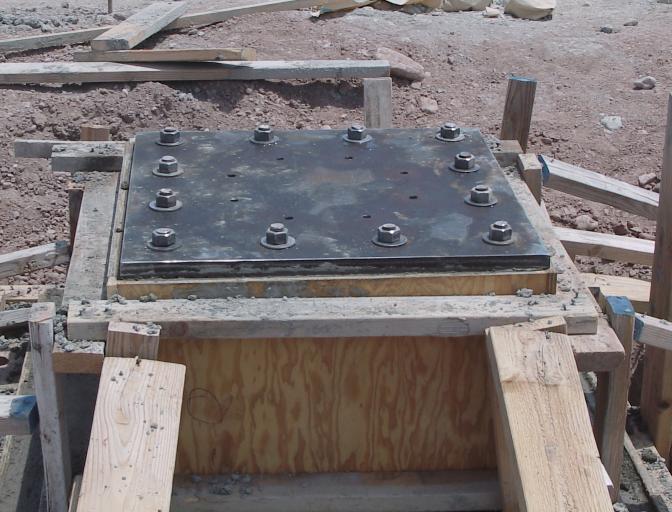
I also had templates made for the bolt patterns for the baseplates of each set of steel columns, and get the baseplates made. They would be welded to the columns on site. The templates would also be used to sink J-bolts into the concrete to bolt the columns down. You can see the bolts sticking up out of the slab in the photo.
I also needed to provide steel purlins to run horizontally between the columns of the building skeleton; the building siding would attach to the purlins with screws. There had to be a supply of steel rod to make cross-bracing for the steel skeleton, and I had to get an entry door and the steel necessary to frame it into the building's skeleton.
One more small detail: I had four square plates cut to enclose the ends of the box beams that would form the top of the long walls and the rolloff roof rack.
The wood rafters for the building's gable roof also had to be engineered; in addition to holding up the roof, they had to provide support for hoists which would be mounted in the ceiling of the observing building to help assemble and disassemble telescopes, and move telescopes and mounts between the basement and the observing floor.
And in my spare time, I needed to find a supplier for the residential steel siding for the building and the roof.
As architect and general contractor, no one would be more relieved than I when the building was finally erected. Every day there was a list of things that needed to be done for the observatory project. One of the primary problems was that this construction job was 175 miles from the nearest construction supply store, so I had to make sure there were enough supplies to keep things moving. Everything from nuts and bolts to welding rods and wrenches had to be anticipated, procured, and brought to the building site.
At the end of this bit of construction, you can finally begin to visualize what the building is going to look like.
One of the mistakes made during the construction was that the access ramp the excavator used to dig the basement hole was dug in the location where we were to pour the footings for the telescope piers. These footings should have been placed in undisturbed soil. In order to mitigate this problem, we had to do a lot of extra work.
First, when the ramp was filled in, extra time was taken to drive the heavy equipment over the area as each layer of dirt was dumped in, to compact the soil as much as was practical. Now, with the footings poured, we backfilled the hole surrounding the footings by hand, using a motorized tamper. A few shovelfuls of earth were thrown in, wetted down, and then tamped. All told, a day and a half was spent doing this; the footings should be pretty solidly in place.
Once that was done, we excavated and laid rebar for the subfloor for the observing building. Inch-thick slabs of styrofoam were placed around the two telescope footings so that the subfloor slab would not contact these footings. This will isolate the telescopes from building vibrations.
Simultaneously with the tamping operation, the electrician was out to install the electrical panel in the basement. He put in a temporary double-duplex outlet so we no longer had to run a couple of hundred feet of extension cords to get electrical power to the building site.
This was a time of extensive planning work on my part. The steel frame of the building would soon be erected on the subfloor slab, but the vertical members at the north end of the building would be on top of the stairwell walls 27" (69 cm) above the height of the slab. Additionally, the vertical supports of the rolloff rack would be placed on their own individual footings built on top of the basement roof. The top of these three sets of columns all had to be exactly level with one another; the beams on which the roof would roll would sit on top of the columns.
First, the steelwork was sized by a structural engineer. The building had to withstand 100 mph (160 km/hr) winds without significant flexure. This isn't as easy as it sounds -- remember that the roof rolls off the building, so there are no horizontal supports at the top of the walls to hold the walls together (or apart, as the case may be). It turned out that the skeleton of the building had to be built with 6" (15 cm) box beams, which have a wall thickness of 1/4" (6 mm).
I then sat down with a computer-aided drafting program and began to design the steelwork that would frame the building, rolloff rack, and roof. All of this steel had to be cut to exact lengths in Tucson; we weren't going to be able to do this cutting on site! And it all had to go together correctly the first time, or construction would have to stop. I spent a lot of time learning to use the program, then drawing, calculating, and redrawing until I was certain I had everything exactly right. This included bracing in the corners at the top of the walls and at the end of the roof rack to keep the building and the rack square.
At the same time, I got the V-groove wheels on which the roof would roll and designed brackets to attach them to the base of the roof; then those brackets had to be fabricated. Then I had to size the angle iron the wheels would roll on, and make sure that got onto the steel order, too.
To keep the roof from blowing away, C channel would be attached along the top of the building walls and the bottom of the roof, arranged in an interlocking fashion so the roof couldn't be lifted away. That all had to be designed in concert with the roof eave detail so that everything would fit without interference.
I also had templates made for the bolt patterns for the baseplates of each set of steel columns, and get the baseplates made. They would be welded to the columns on site. The templates would also be used to sink J-bolts into the concrete to bolt the columns down. You can see the bolts sticking up out of the slab in the photo.
I also needed to provide steel purlins to run horizontally between the columns of the building skeleton; the building siding would attach to the purlins with screws. There had to be a supply of steel rod to make cross-bracing for the steel skeleton, and I had to get an entry door and the steel necessary to frame it into the building's skeleton.
One more small detail: I had four square plates cut to enclose the ends of the box beams that would form the top of the long walls and the rolloff roof rack.
The wood rafters for the building's gable roof also had to be engineered; in addition to holding up the roof, they had to provide support for hoists which would be mounted in the ceiling of the observing building to help assemble and disassemble telescopes, and move telescopes and mounts between the basement and the observing floor.
And in my spare time, I needed to find a supplier for the residential steel siding for the building and the roof.
As architect and general contractor, no one would be more relieved than I when the building was finally erected. Every day there was a list of things that needed to be done for the observatory project. One of the primary problems was that this construction job was 175 miles from the nearest construction supply store, so I had to make sure there were enough supplies to keep things moving. Everything from nuts and bolts to welding rods and wrenches had to be anticipated, procured, and brought to the building site.
Wed Jul 23 09:21:41 MST 2008
Above Ground Level at Last
Once we reached ground level, the fortunes of the BRO construction project
seemed to turn, and things proceeded much more quickly. What follows here
is the result of a 6-day marathon construction session in April/May of 2001.
The plastic was removed from the basement roof, and the footings for the rolloff roof rack were built on top of the basement roof, and the stairwell opening was extended upward to its final height. This last was an adventure; though it was late April, a cold storm had moved in, and it was snowing atop the nearby Chiricahua Mountains (about 10 miles to the west). The wind was blowing so hard that we were seeing flurries from the mountaintop storm. At one point, the builder scooped a trowel full of mortar to lay a block, and the wind blew the mortar off the trowel!
We coated the basement roof with waterproofing, and laid the plastic back down to provide additional water protection. Later, after the mortar had had time to cure, we also waterproofed the stairwell extension and the column footings.
The septic line, water line, and plumbing air vent lines were installed using the piping we'd thoughtfully put in the walls before filling them. We also ran the electric line from the power pole into the basement through a prepunched hole in the block wall.
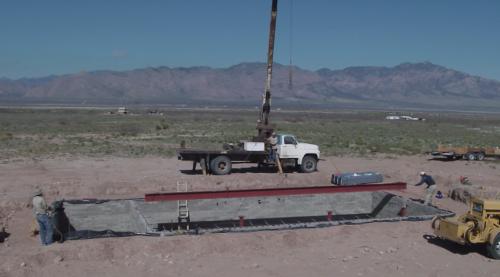
The basement was then buried, and two holes were dug in the area where the basement access ramp used to be; forms were built in these holes for the two telescope pier footings. The footings were poured and prepared steel plates were embedded in the top; the telescope piers would bolt to these plates.
By now, the concrete trucks were getting used to finding this construction site. Each pier footer involved almost 5-1/2 tons (5,000 kg) of concrete, so it took two trucks. And the steel plates on each footer weighed 300 lb (135 kg) themselves.
That was a tough time. I drove 3 hours back to Tucson at the end of a construction day to pick up a U-Haul trailer. Then it was up early the next day to pick up the rebar cages for the pier footings and haul them down to the observatory. That night, after another day of construction, I drove back to Tucson to pick up the plates (which weren't yet ready the first day; my own fault for poor planning), then left at 3 a. m. to get to BRO at 6 to prepare for the 7 a. m. arrival of the concrete.
At the end of all that work, though, an observatory is still somewhat hard to visualize.
It is now one year since the basement hole was dug, but the long struggle to get the building put up is nearly ended.
The plastic was removed from the basement roof, and the footings for the rolloff roof rack were built on top of the basement roof, and the stairwell opening was extended upward to its final height. This last was an adventure; though it was late April, a cold storm had moved in, and it was snowing atop the nearby Chiricahua Mountains (about 10 miles to the west). The wind was blowing so hard that we were seeing flurries from the mountaintop storm. At one point, the builder scooped a trowel full of mortar to lay a block, and the wind blew the mortar off the trowel!
We coated the basement roof with waterproofing, and laid the plastic back down to provide additional water protection. Later, after the mortar had had time to cure, we also waterproofed the stairwell extension and the column footings.
The septic line, water line, and plumbing air vent lines were installed using the piping we'd thoughtfully put in the walls before filling them. We also ran the electric line from the power pole into the basement through a prepunched hole in the block wall.
The basement was then buried, and two holes were dug in the area where the basement access ramp used to be; forms were built in these holes for the two telescope pier footings. The footings were poured and prepared steel plates were embedded in the top; the telescope piers would bolt to these plates.
By now, the concrete trucks were getting used to finding this construction site. Each pier footer involved almost 5-1/2 tons (5,000 kg) of concrete, so it took two trucks. And the steel plates on each footer weighed 300 lb (135 kg) themselves.
That was a tough time. I drove 3 hours back to Tucson at the end of a construction day to pick up a U-Haul trailer. Then it was up early the next day to pick up the rebar cages for the pier footings and haul them down to the observatory. That night, after another day of construction, I drove back to Tucson to pick up the plates (which weren't yet ready the first day; my own fault for poor planning), then left at 3 a. m. to get to BRO at 6 to prepare for the 7 a. m. arrival of the concrete.
At the end of all that work, though, an observatory is still somewhat hard to visualize.
It is now one year since the basement hole was dug, but the long struggle to get the building put up is nearly ended.
Wed Jul 23 09:03:44 MST 2008
Another Long Delay
After a short search, I found a structural engineer to do some calculations
that would size the steel needed to hold up the basement roof. My own quick
figuring showed that the concrete roof slab would weigh around 50,000 pounds
(23,000 kg), and the weight of the overlying earth would be about 200,000
pounds (90,000 kg).
We'd poured the concrete slab for the basement floor with thick 4-foot-square pads at two positions in the center, and smaller pads at each end, to support 4 steel columns that would hold a center beam. So all of this weight had to be supported by the 4 walls and the center beam.
The roof was built essentially exactly like a small highway bridge, with support at both sides and down the middle, with steel bridge decking laid across the supports to hold the concrete. A 7-inch concrete slab would be poured over that, with rebar supports every 12 inches in both directions.
The center beam was sized to hold all of this weight with supports every 17 feet, though the beam is actually supported every 13 feet.
The structural engineer, unfortunately, lost my first set of drawings, and turned out to have a method of operation where he would never call you, but rather would wait until you called him for a status report. That's how I learned that nothing was happening. So I got him a second set of drawings, and I didn't get results for several weeks after that. The final tally was that it took 4 months to get the figures I needed.
It turned out that the beam would need to be a "12W50" I-beam, which means the web is 12 inches high and the beam weighs 50 pounds per foot (75 kg per meter). The basement required a beam length of 40'-4" (12.3 meters). The beam is about 10 inches (25 cm) wide and the steel is about a half-inch (1-1/4 cm) thick.
So I ordered the steel, had the support columns made, and found a trucking company to haul the I-beam and the 4 steel columns from Tucson to the BRO site. We then used a boom truck to drop the steel beam in place.
After that, we drilled holes in the top of the wall and epoxied some bolts into place. A steel plate was then fastened to the top of the wall using these bolts. The steel bridge decking was laid in and welded to the plate and to the center beam.
After lacing in the rebar, the roof slab was poured. In April of 2001, the basement was finally enclosed. We covered the fresh slab with plastic and waited three weeks for the concrete to cure slowly, for maximum strength.