Log of the Bunker Ranch Observatory
A ChronicleColor from a Grayscale Camera
How to Coax Color from a Grayscale Camera
Mama, Don't Take My Kodachrome Away
Last update: 7/27/08
A simple idea
In principle, it's easy to take color images with a grayscale camera. (A grayscale camera is one that takes "black-and-white" images, which really have a whole range of shades of gray from black to white.)
You start with a camera and 3 color filters -- red, green, and blue, and take 3 images of the same scene, one with each filter. Now you have 3 grayscale images, one containing red information, one containing green information, and one containing blue information.
With a modern computer-controlled camera, these 3 images are not actually on pieces of film; they're image files stored in the computer as arrays of numbers. Each number indicates how bright or dark one particular tiny square of the whole picture is. Combining all of these numbers together and displaying them as bright or dark spots on a computer screen, in the correct order, places the picture on the screen for everyone to admire.
So let's take the red image as an example. It's still just grayscale, but it has the "red" information from the image. Where the image is black, we'll leave it black -- black means no red at all. But where the image is very dark gray, we'll change it to very dark red. Medium grays become medium reds, light grays become bright reds, and white becomes very, very bright red (not white; we're looking through a red filter, so making something white would add green and blue to this red image).
We do the same thing with the green and blue images. Of course, all of this is being done by computer software -- we haven't brought out the crayons yet! So now we have 3 images of the same scene: one red, one green, and one blue.
Next, we tell the computer, through more clever software, to stack all three of these pictures one on top of the other. The software then calculates the result of adding those three separate colors together, and puts a nice color image on the screen.
"Gosh," you say; "that was really simple. No wonder you figured out how to do it after only a few months." Well, as you've probably come to expect by now, there are complications.
Complications? You don't say ...
I've talked about how to "fix up" CCD camera images elsewhere; let me just remind you that there are corrections to be made to compensate for the temperature of the camera when the picture was taken, and to correct for image imperfections such as dust spots and vignetting. All of that gets done to each of the grayscale images before trying to assemble them into a color image.
The next spot of trouble is that the telescope might have moved slightly between each of the red, green, and blue images. If the images were taken on separate nights, the difference in aiming of the telescope might even be more than just "slight". This means that more computer software has to be employed, to figure out how to align the red, green, and blue images so the stack together correctly. This involves not only shifting the images left-right and up-down, but might involve rotation as well.
So one of the images is selected as a reference, and the other two images are translated and rotated as necessary so the stars in each of them align with the reference image. This can be done by hand, but software also exists that can do this automatically, and by several different techniques, should it happen that some particular technique fails due to the vagaries of a particular image.
So now you stack the images to get a nice, pretty color picture, and you're done. Wait -- you can't see very much in this picture, and the supposedly-black sky is greenish, and that red nebula looks kind of purple. What's going on? Suddenly, it doesn't look quite so simple.
Where's the picture?
Let's deal with the first problem: "you can't see very much in this picture".
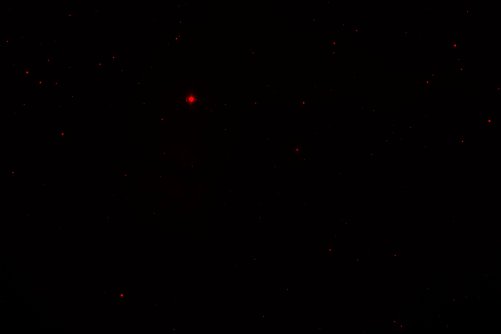
The CCD camera is quite sensitive, but stars are quite a bit brighter than the gaseous nebulae that are arguably the more interesting part of the images. Even moderately-bright stars saturate the camera after just a few seconds (the camera records each tiny picture element (pixel) as one of 65,536 shades of gray; "saturate" means being so bright that it drives the picture element all the way to the 65,536 limit). So really long exposures, to get the nebulas to register, would overexpose many of the stars.
So a typical picture has a few saturated stars and lots of other stars that are quite bright, but the nebulosity we're really interested in is barely visible. But since this image is just a bunch of numbers inside a computer, we can manipulate the image by modifying those numbers. We can use software to find the nebulosity in the image and artificially make it more visible by increasing the numbers that correspond to it. Once that's done, the nebulosity becomes much more visible, to say the least:
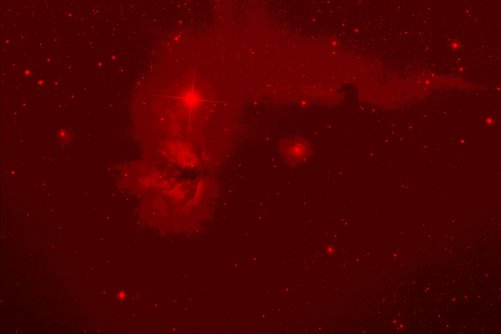
(For the cognoscenti: yes, I've overdone it in this example, to make the following point more clearly.)
What's this greenish cast?
In general, the sky is brighter in green light than it is in red or blue, due to light pollution from man-made lighting. This effect is pretty minimal at the Bunker Ranch Observatory, but it does occur -- and, of course, other less-dark observatory sites have this problem to a much greater degree.
The way to fix this problem is to equalize the "black sky" background of the individual red, green, and blue grayscale images before doing any other manipulation of the image. This is done by finding the image with the brightest background (again, using a computer image manipulation program) and subtracting a value from every pixel in that image to make its black sky the same "black" as the others. This usually means adjusting the green image so it is the same as the red and blue ones.
By doing this, all three grayscale images have the same level of black in the sky background, so the overall background will be a neutral nearly-black level of gray when the images are stacked. The background will not be completely black in any of the images, because of airglow and scattering of starlight by the atmosphere. But it is possible to use image-manipulation software to subtract that out, as well, to produce astrophotos with very deep black sky background.
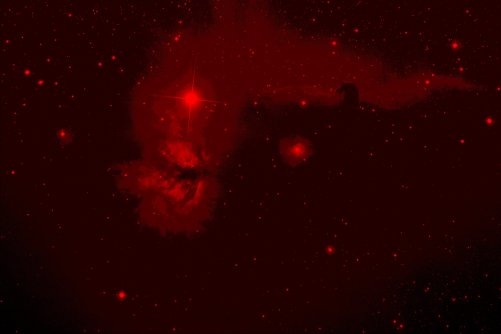
Since you've alreay seen a red image, let's use that again instead of green for our example. After hiking up the nebulosity, as described in the previous section, we find that we have also hiked up the sky background. So we apply a correction to bring the sky brightness back down toward black:
That color doesn't look right
"I thought you said that nebula was red; looks kinda purplish to me." The human eye's response to color is rather complex; it would be very difficult to match it with a simple set of 3 color filters. Additionally, filters made for gathering scientific data are designed with that in mind; there's no consideration given to matching human vision. And, finally, the response of the camera's light sensor is different in different colors of light. All of these factors, plus others, conspire to mean that the telescope plus filter plus camera combination isn't going to yield a color response that matches human eyesight.
One simple technique to ameliorate this problem is to expose the individual red, green, and blue grayscale images for different lengths of time to control the amount of red, green, and blue that go into the final image. This same effect can also be simulated by image-manipulation software. The image-processing software can also be used to modify the color balance of the image to try to more closely match "true" color (although the whole idea of "true" color is a somewhat slippery concept).
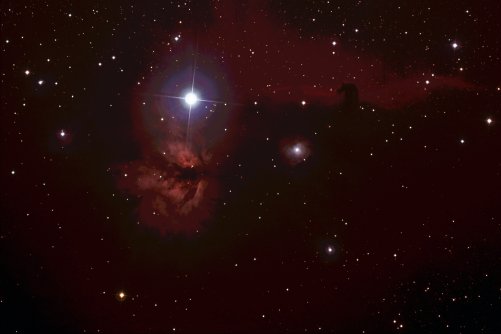
A simple stacking of the RGB grayscale images yields a somewhat washed-out image that has a slightly purplish tone:
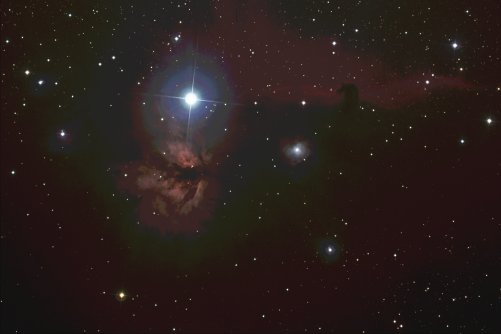
That image was manipulated to even out the red, green, and blue color channels, and then the red channel was enhanced a bit to make the nebulosity more reddish-looking:
So we see that there are more difficulties than might at first seem obvious. There are more complex techniques than a simple combination of RGB images to get esthetically-pleasing color astrophotos. It is also interesting to take astrophotos that do not even attempt to match what a super-sensitive human eye would see, but rather emphasize aspects of astronomical objects that the human could not see.
Another pseudo-visual technique
In an attempt to make astrophotos even prettier, and perhaps, though not necessarily, make them correspond more closely with what the eye would see, a modification of the RGB technique described above can be used. The idea is to take an additional image in white light, with no filter; this is used to provide the detail in the image. A combined RGB image is then layered onto this white-light image (referred to as a "luminance" image) to provide the color information. (In practice, this image is taken through a clear filter, rather than no filter at all, so the focus position doesn't change.)
The idea here is to use the luminance image
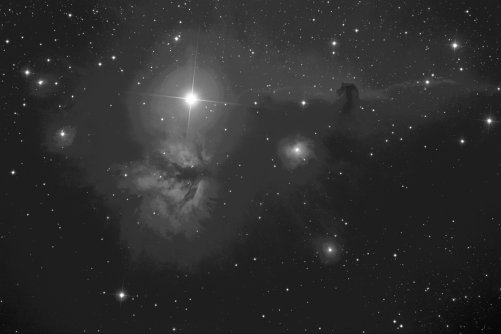
to provide detail much as the human eye might perceive it. It is processed to bring out as much detail as possible. The RGB image is often slightly blurred so as to provide color while not obscuring the detail in the luminance image. This technique is referred to as "LRGB" to distinguish it from the simple RGB technique, and can be quite effective at producing a spectacular color image like this one, which was created from the very LRGB images you've seen here.
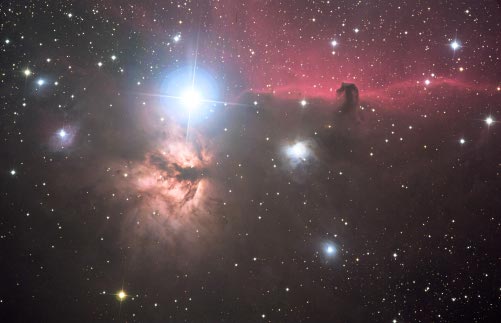
Here's that same image in all of its full-resolution glory.
A variation on this technique, which falls more under the catogory of obtaining an image that the human eye could not see, is to use a specialized grayscale image in place of a luminance image. One popular way of doing this is to take an image in hydrogen-alpha light.
Hydrogen-alpha light is a very red color emitted by hydrogen atoms; so red, in fact, that most color films are insensitive to it, because they would make color pictures appear somewhat reddish, rather than the somewhat bluish color that most people prefer. (It is perhaps worth noting that the more-reddish color is actually more correct; it's just not what people prefer to see in their color prints. This is arguably good for photographers, but bad for astronomers, who really want that hydrogen-alpha light.)
There is a lot of hydrogen in space, and it often collects into vast clouds from which stars can eventually form. These clouds therefore emit a lot of light in hydrogen-alpha. Not all nebulas are hydrogen-alpha clouds, but for the ones that are, this technique produces interesting results.
So, by taking a grayscale image with a filter that only lets hydrogen-alpha light come through, you get a highly-detailed picture of the hydrogen gas in a nebula. You then use this in place of the luminance image in the LRGB technique, again using the RGB stack to provide color. This is known as HaRGB (the "Ha", of course, is hydrogen-alpha).
Non-pseudo-visual techniques
What if you don't even try to simulate human-eye colors in an astrophoto? What if, instead, you take grayscale images in specific narrow colors of light that correspond to hydrogen and other elements besides hydrogen, like sodium, oxygen, or calcium, then assign specific colors to those grayscale images and stack them together?
The result would be a false-color image; it wouldn't look anything like what you would see with the naked eye, but it would show where the concentrations of some of these other elements was highest and also show where they were mixed together. The results can be very beautiful and have scientific value as well.
Don't tell our two cats, but as you can see, there is more than one way to skin one ...