It starts with a night suitable for astrophotography -- clear, moonless, not too breezy, with little or no twinkling of the stars. This isn't an easy combination to come up with in Wisconsin, but it's reasonably common out in the desert of New Mexico.
At least, that's what it says here (even if I had to write it myself!).
Next, you pick a site well away from the lights of the city. Back in the days of film astrophotograpy, this was a lot more important than it is now -- digital techniques can compensate for the city's light pollution. But it's still a lot easier under dark skies than under bright skies.
The equipment required: a telescope of good optical quality, riding on a mount that is capable of computer-controlled very accurate tracking of the stars, and a digital camera that is sensitive to low levels of light.
The accuracy of the mount is very critical -- the full Moon is nearly 2,000 arcseconds wide, and, for the best results, the mount must keep the telescope pointed to within 1/10 of an arcsecond. In other words, the tracking accuracy required is 1/20,000 of the width of the Moon!
The sensitivity of the camera is also important. In a shady scene, your digital camera might take a good picture in 1/100th of a second. But this picture of the Rosette Nebula (just to the left of the constellation Orion) took an hour and 20 minutes of exposure (and could have used more).
Color cameras with this level of sensitivity to light are starting to become available, but at some loss of resolution. So, for highest resolution, BRO uses a special black-and-white camera. It's not really black-and-white; it takes pictures with all shades of gray in between black and white, or grayscale -- but early TVs were called black-and-white despite the fact that they were really grayscale, too, and the name stuck.
Now I can hear you thinking: "OK, wise guy -- that picture of the Rosette Nebula is in color; what's this sunshine about using a grayscale camera?"
Let's talk about how a digital camera works. Consider a checkerboard (or a chessboard if you want to put on airs). It's composed of a whole bunch of squares, and so is the light sensor on your digital camera (which works just the same way as the BRO camera does). Each tiny square of the light sensor (called a pixel, which is short for picture element) is made of a material that is very sensitive to light. Of course, a simple 8x8 checkerboard wouldn't give you much of a picture; the "checkerboard" of the camera used at the observatory is made of 2,672 rows of 4,008 pixels (almost 11 million squares). Physically, the sensor is one inch high and 1-1/2 inches wide, so you can see that these pixels are very tiny (in fact, they are just 9 microns on a side).
When a photon of light hits one of these pixels, an electron is knocked off the material. The pixels are constructed so that these electrons are collected inside the squares and held here. A square that gets hit by lots of photons collects a lot of electrons; a square that doesn't get hit by very many photons only has a few electrons.
You point this light sensor at the scene you want to image (focused by a lens or a telescope), and open the shutter. The parts of the scene that are bright (for an astrophoto, that means a star) hit the pixels with lots of photons from the star; the sky background (which is almost, but not quite, black) doesn't allow very many photons to hit those pixels. So you get a lot of electrons in the pixels where there are stars, and only a few electrons in the pixels where there is just black sky background. Things like gas and dust clouds in outer space light up their pixels to something in between.
Then you close the shutter, and no more photons hit the pixels. The camera's computer then visits each square, draining out and counting all of the electrons. It writes all of those electron counts onto the memory card (or, in the case of BRO's camera, reports all of these counts to a controlling computer).
To display a picture on a computer screen, the computer puts dots on the screen in the same pattern as the checkerboard. If the upper-left square has lots of electrons, a bright dot is put on the screen in the upper-left corner. If the upper-right square has only a few electrons, a very dim (or black) dot is put on the screen in the upper-right corner. The number of electrons in each square determines how bright (or dim) the dot in the corresponding part of the screen will be painted.
Humph, you say; he babbles on for five paragraphs, and I STILL don't know where the color comes from! Patience, grasshopper; reward is coming, but a few paragraphs yet remain.
Your basic bog-standard rainbow has 7 colors, as you learned in elementary school, but I'll bet you can name more colors than that just off the top of your head, even if you forget "chartreuse". How does this happen?
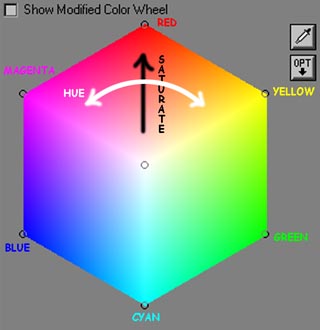
Your eye can distinguish millions of colors; we know today that all of these colors can be made just by mixing the three primary colors (red, green, and blue) in various combinations. In fact, that's how color film works -- there are actually 3 layers of emulsion in the film, each sensitive to one of the 3 primary colors. (You were probably taught that red, yellow, and blue were the primary colors, and they are still today referred to as &qout;artist primary colors"; this is wrong, for technical reasons that I'll spare you here -- but even Leonardo da Vinci knew this was incorrect. RYB is weak in greens and cyans. You can see this for yourself by studying this color chart.
Your mother told you not to sit too close to the TV, but if you ignore her sage advice and bring a magnifier along with you, you can see that your TV screen is made up of lots and lots of little dots; these dots are colored red, green, and blue. They're so small that they blend together when you sit back like your mother told you. It is these dots that give your TV a color picture, by lighting up combinations of colors in varying brightnesses to give you the color the TV show's producer meant you to see.
For example, the color orange is made up of a full-brightness red dot, about a half-bright green dot, and no blue at all. Brown is made from a half-bright red with very dim green and blue dots. On a regular TV or computer monitor, these color mixes are represented as controlled electrical voltages. On a flat-panel computer screen (or the new digital TVs), these color values are given as numbers; each dot has a brightness in the range of 0 to 255, with 255 being the brightest and 0 meaning turned off. Expressed that way, orange is red = 255, green = 165, blue = 0; brown is red = 165, green = 42, blue = 42.
It's important to realize that your camera's light sensor does not have colored dots; it's the computer screen (or TV) that has the colors. Your camera (like BRO's camera) just counts electrons in the pixel squares and converts the counts to this 0 to 255 scale.
So to make a color picture here at the observatory, three separate grayscale pictures are taken, one with a red filter, one with a green filter, and one with a blue filter. The computer takes all three pictures, and displays the red-filtered grayscale picture on the screen using only the tiny red-colored dots, while the green-filtered picture uses the green dots and the blue-filtered picture uses the blue dots. Step back from the screen a bit, now, to let the dots blend together -- and there's a color picture!
This happens because the red-filtered grayscale image is bright where the picture has lots of red and dim where the picture has only a little red. Similarly, the green and blue grayscale images vary according to how much green and blue are in that area of the picture.
"But my digital camera doesn't take three pictures -- it just takes one.", you complain. True, but your camera's manufacturer took your checkerboard light sensor and painted every one of the little squares with a very thin coat of red, green, or blue paint (well, not literally, but you get the idea), so only blue light gets through the blue paint, etc. The computer inside your camera writes the image onto your memory card knowing which pixels have which color of paint, so it can write color image data onto the card using one of the standard methods of recording color pictures. That's why your camera's manual talks about JPEG or TIFF -- they're two different methods of recording color image data.
Of course, this trick has a cost -- now it takes three pixels of the light sensor to record one element of picture data, one pixel for each of the three colors. So your picture is not quite as detailed as it could be, because of this trick for doing color in one shot. It's to avoid this loss of resolution that the camera used at the observatory uses interchangeable filters instead of using a sensor with built-in filtering. Each color uses all 11 million pixels, thus capturing as much detail as possible.
If you've made it this far without falling asleep, you deserve a nap! But you just know it's more complicated than that, and you're right.
The electrons that get knocked off the sensor material by photons are not, obviously, stuck to that material very well. In fact, electrons can detach all by themselves, and doing so introduces errors into the picture because these added electrons make it look like there was more light than what actually hit the sensor. This phenomenon is called "dark current", because it's a flow of electrons just like the current that flows through your house wiring (though far, far fewer electrons are involved) and because it happens even when the image is dark (even when the shutter is closed).
This happens to your digital camera, too -- but since you normally take images of much brighter things than stars, with very short exposure times, the few extra electrons don't have any noticeable effect.
For astrophotos, though, it's another story. The exposures are long; sometimes a half-hour or more, and the subject gas and dust clouds are very dim. These extra electrons can actually overwhelm the rest of the picture.
The first thing that's done to combat this problem is to cool the light sensor; the colder the sensor, the fewer of these electrons come off the material by themselves. The camera used here at BRO has a cooler built in; on cold winter nights (well, cold for the bootheel of New Mexico, anyway!), the camera is running at temperatures below 30 degrees below zero.
The second thing that helps beat dark current is something that can be done because the camera is digital: all it records are a bunch of numbers corresponding to electron counts. The trick is to take a picture with the shutter closed (deliberately, not as though the lens cap was accidentally left in place). If this is done at the same temperature as the actual picture, for the same amount of time as the actual picture was exposed, we then have an image that records the amount of dark current that got added to the real light picture when it was taken.
It's a simple matter, then, to have the computer subtract the dark picture from the light picture, and thus the light picture is now corrected to remove the effects of the dark current. All of the images you see from BRO have had this technique applied.
You may be tempted to conclude from this that your old Brownie camera had some advantages over this digital new-fangled stuff after all. But the fact is that film fogs over time, too, just sitting there, and heat also affects this rate of fog. Professional photographers store their film in the refrigerator (or even the freezer) to slow down this effect. In fact, you'll find film in the refrigerator and freezer here at BRO.
The difference is that with film, there's nothing you can do about fogging (which happens for a number of reasons), but with a digital camera, you can compensate for the fog-like effects of dark current.
Something else you can't do anything about is dust on your lenses. You can try to keep them clean, but they're never going to be perfectly clean. And, Mother Nature being sneaky, sometimes dust can even find its way inside the lens, and sit between the lens elements where it cannot be removed without disassembling the lens (somehing not too many folks are willing to attempt).
But digital techniques can come to our rescue. If you take a picture of an out-of-focus, perfectly evenly-illuminated screen, you get an image that is, in theory, composed of exactly the same brightness at every pixel (a "flat" image). But dust on the lens (or, in the case of BRO, on the color filters, or on the clear window that protects the light sensor), block a bit of this perfectly-even light. So what we get is a recording of where the dust specks are on the filters.
These dust spots will also block some of the light coming from the dim objects we're trying to photograph in the night sky. You may not be able to see the effect of this, but nonetheless, it happens. Using one of these perfectly-illuminated pictures, computer software can correct the image for the effect of the dust spots. This technique is called "flat-field" correction.
This isn't done yet here at BRO, but it will be soon. You see, dust spots aren't the only problem we can solve with flat-field correction. Optical systems have various kinds of defects, most of which are irrelevant here, but one that isn't is something called vignetting (pronounced "vin YET ing", because the word is French). Briefly, what it means is that the outer corners of the image don't get as much light as the very center of the image.
Of course, if you had a very tiny light sensor, or an optical system that only began to vignette at some distance from the center, this effect would be unimportant. But light sensors are getting larger all the time (the one in use at BRO is one inch high by one-and-a-half inches wide), so vignetting is becoming more and more of a problem. And some optical systems vignette more than others; in fact, there have been some poor telescope designs in the past that started vignetting right at the very center of the image!
A flat-field image will make a record, not just of the dust spots, but also of the vignetting (remember that the actual thing we're taking a picture of is perfectly evenly illuminated). So proper use of the flat-field technique would compensate for both problems at the same time.
"Is there anything else I really don't want to know, but you're going to insist on telling me anyway?". But of course ...
When you look at a photograph of the night sky, as taken here at BRO, most of the time you won't see anything but a few stars on an otherwise-black screen. "Not much of a photographer; all of his pictures are WAY underexposed."
Your eye is capable of discerning millions of colors, but only about 64 different levels of brightness (shades of gray) between white and black. A digital camera records far more shades of gray; if you have an old digital camera, it may record 256 shades of gray, a newer one might record 4,096 shades of gray. The camera in use at the observatory is capable of recording 65,536 shades of gray.
Here are grayscale bars with 33 shades of gray -- you can see that adjacent bars are barely but definitely distinguishable from one another.
("Where do all of these funny numbers come from?", you ask. "How come it's not a nice round number like 4,000 or 65,000?" Well, computers don't count with 10 fingers like we do; they count with 2's (using switches that are either ON or OFF) instead of 10's. So to a computer, a "round number" is a power of two like 4, 8, 16, 32, instead of a power of ten like 10, 100, 1,000, 10,000, etc. But this is a photography lecture, not a computer science lecture, so I'll just let it go at that. Let it suffice to say that 256, 4,096, and 65,536 are powers of two.)
Now where were we? Ah, yes -- shades of gray. So what your eye sees as several of the very blackest shades of gray are, to the camera at the observatory, several thousand shades of very dark gray. And, since many of the interesting things in the sky are very dim, it is down here near the dark end where these several thousand shades of gray from astronomical objects like the Rosette Nebula live. So all of that black stuff your eye sees is really all of the interesting information that will make up our picture of the Rosette.
Using special computer programs (you may have heard of Adobe PhotoShop, for one), the blackish image is manipulated so that the thousands of nearly-black shades of gray are stretched to cover the whole range from black all the way to white. Some of the blacker parts of the image are lifted until they are a medium gray, as seen by your eye. And now you have something your eye can recognize as a nebula.
One of the problems with doing this (this guy sure has a lot of problems ...) is that the night sky is not completely black. So when the image is stretched in this manner, the sky background gets very grayish-looking. This doesn't look very pleasing, so another procedure is used to chop off all of the levels of gray that come from the sky background (turning them back to black or near-black) while leaving untouched all the somewhat brighter levels of gray that represent the dimmest parts of the nebula. This is called changing the "black level", and is something your own digital camera's software may let you do.
This stretching is done in a consistent manner to all three of the grayscale images (red, green, and blue), so as to do as little violence to the original color balance of the image as possible. The black-level adjustment is done differently for each grayscale image, because the sky has a different background brightness in each color.
So, finally, we combine these processed grayscale images, in the manner described back when we were talking about RGB, and now we have, at last, a pretty picture, in color! Of course, there's still more we can do, but it's not really relevant to understanding the basic process, so I'm going to stop right here.
"Well, Mr. Know-It-All, my digital camera doesn't have one of those light sensor things. My camera's manual says something about a CCD; so how come you didn't tell me about that instead of prattling about all of this boring stuff?"
I used the term "light sensor" to avoid having to explain this until I was good and ready. But then I just never got really good and ready, because it seemed to break up an otherwise fascinating and riveting narrative. You, in the back -- wake up!
The term "CCD" stands for "charge-coupled device". The "charge" part comes from the electrons that hold the picture information while the exposure is being made. The "coupled" part comes from the way the charge is counted by the electronics and read out of the rows of the array of squares (pixels). "Device" is just a fancy engineering term for "thing".
Few people realize this, but now you are in the know: the term CCD does not actually refer to the light sensor itself, but rather to the method that is used to read out the image information from the light sensor. The pixel on the end of the bottom row is sensed and its electrons (the "charge" part) counted (the "coupled" part). Then the row is shifted so that pixel falls off the end (the "device" part), revealing the next pixel to the counter. Continuing to count and shift in this manner eventually reads out the entire row. That is the charge-coupled device.
So using this CCD idea, we can make a light sensor by lining up lots of rows of pixels (this makes our checkerboard). When the bottom row is counted, the whole checkerboard is shifted down one row so the next row is at the bottom, and we use the same procedure to count the electrons in the pixels in that row. Then the entire checkerboard is shifted down one row again, and the procedure repeats until all of the rows have been counted.
So now you know why I used the term "light sensor" instead of CCD. Common usage, though, now refers to the light sensor as a CCD or "CCD chip", so the correct usage of the term is fast being lost to history.